
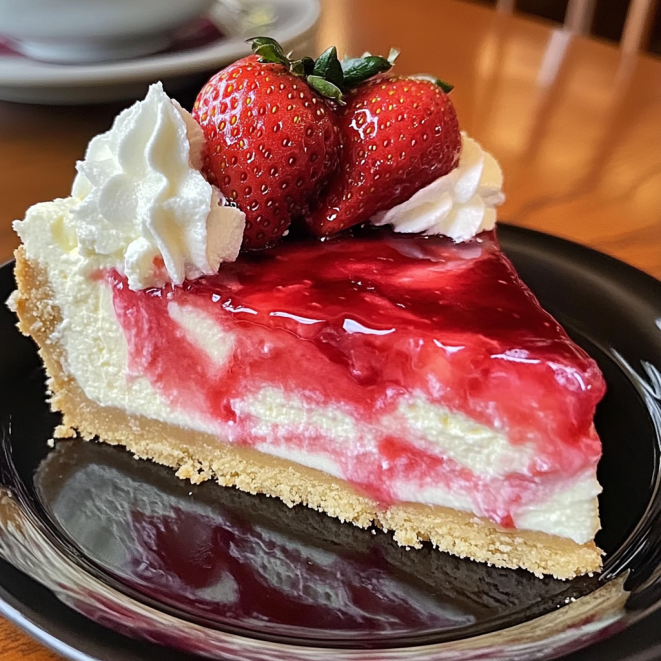
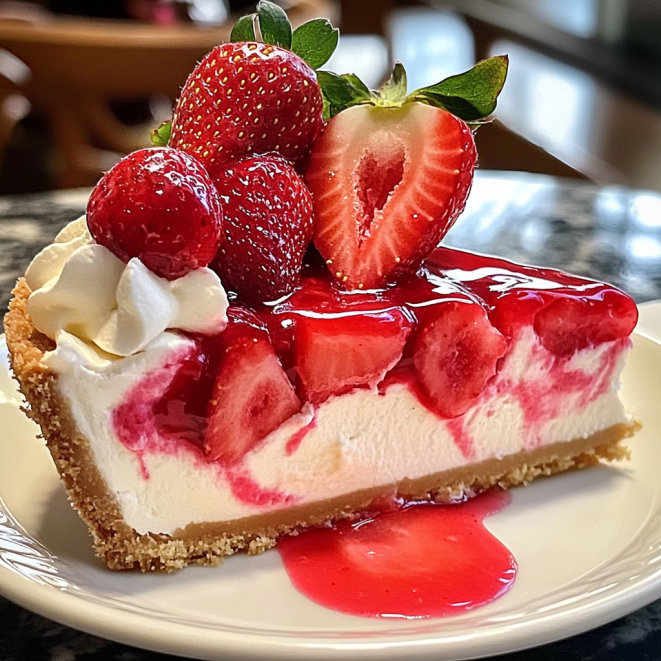
What Is Strawberry Swirl Cheesecake?
Imagine biting into a smooth, creamy cheesecake layered with tangy ribbons of fresh strawberry swirl—yep, that’s strawberry swirl cheesecake, and it’s just as dreamy as it sounds. It’s not just any dessert; it’s a crowd-pleaser that’s perfect for birthdays, holidays, or just a midweek pick-me-up.
Why You’ll Love This Strawberry Swirl Cheesecake
Honestly, who can resist a dessert that’s creamy, tangy, and bursting with fresh strawberry flavour all at once? This strawberry swirl cheesecake hits all the right notes: it’s smooth and luscious, yet fresh and fruity thanks to that gorgeous swirl. Plus, it’s incredibly versatile—you can bake it, make it no-bake, dress it up with chocolate or citrus, or keep it simple and classic.
It’s the perfect showstopper for any occasion, whether you’re treating yourself on a cozy night in or impressing guests at a celebration. Also, with easy step-by-step instructions and helpful tips, even cheesecake newbies can feel confident making it.
In short: this cheesecake is a delicious slice of heaven you’ll want to make again and again.
Tools and Preparation
Before you dive into baking your strawberry swirl cheesecake, it’s super helpful to have the right tools and prep steps sorted. This not only makes the process smoother but also helps ensure your cheesecake turns out perfectly every time.
🛠️ Essential Tools
-
Springform pan (9-inch): The classic choice for cheesecakes—its removable sides make releasing your cake a breeze without damaging the delicate edges.
-
Mixing bowls: At least two; one for the crust and one for the filling.
-
Electric mixer or stand mixer: To beat cream cheese and other ingredients smoothly without lumps.
-
Spatula: For scraping down the bowl and folding ingredients.
-
Measuring cups and spoons: Accuracy matters in baking!
-
Food processor or rolling pin: For crushing your biscuits or crackers finely.
-
Saucepan: To make your strawberry swirl sauce.
-
Knife or skewer: To create the beautiful swirl effect.
-
Cooling rack: For gradual cooling after baking.
-
Oven thermometer (optional): Helps maintain precise baking temperature.
🧹 Preparation Tips
-
Room temperature ingredients: Set cream cheese, eggs, and sour cream out for 30–60 minutes so they mix evenly.
-
Preheat your oven: Make sure it reaches the right temperature before you start baking.
-
Prepare your pan: Wrap the springform pan’s exterior with foil if you’re using a water bath to avoid leaks.
-
Line your work surface: Baking can get messy—lay down parchment or a silicone mat.
Ingredients for Strawberry Swirl Cheesecake
🥧 For the Crust:
-
200g digestive biscuits (or graham crackers), crushed finely
-
100g unsalted butter, melted
-
2 tbsp granulated sugar
🍓 For the Strawberry Swirl:
-
250g fresh or frozen strawberries
-
50g granulated sugar
-
1 tbsp lemon juice
-
1 tsp cornstarch mixed with 1 tbsp water (optional, for thickening)
🍰 For the Cheesecake Filling:
-
600g cream cheese, softened to room temperature
-
150g caster sugar
-
3 large eggs, room temperature
-
200ml sour cream or Greek yoghurt
-
1 tsp vanilla extract
-
Preheat your oven to 160°C (320°F).
-
Crush the digestive biscuits finely using a food processor or place them in a sealed bag and bash with a rolling pin.
-
Mix the crushed biscuits, melted butter, and sugar in a bowl until evenly combined.
-
Press the mixture firmly into the bottom of your 9-inch springform pan to form an even layer.
-
Bake for 10 minutes, then set aside to cool while you prepare the filling.
2 tbsp plain flour (optional, helps with firmness)
How to Make Strawberry Swirl Cheesecake
Word Count: ~400
Ready to get your hands delightfully messy? Making a strawberry swirl cheesecake might sound fancy, but it’s actually pretty straightforward when you break it down. Follow these steps, and you’ll have a show-stopping dessert in no time.
🍪 Step 1: Prepare the Crust
-
-
🍓 Step 2: Make the Strawberry Swirl
-
In a small saucepan, combine strawberries, sugar, and lemon juice.
-
Cook over medium heat, stirring occasionally, until the strawberries break down and the sauce thickens (about 8–10 minutes).
-
For a smoother sauce, blend with an immersion blender or in a food processor.
-
If you want it thicker, stir in the cornstarch slurry and cook for another 1–2 minutes until glossy.
-
Let the sauce cool completely.
🍰 Step 3: Prepare the Cheesecake Filling
-
Using an electric mixer, beat the softened cream cheese and sugar on medium speed until smooth and creamy, about 2–3 minutes.
-
Add the eggs one at a time, mixing gently after each addition. Avoid overbeating to prevent cracks.
-
Blend in the sour cream (or Greek yoghurt), vanilla extract, and flour until just combined.
🍦 Step 4: Assemble and Swirl
-
Pour half of the cheesecake filling over the cooled crust.
-
Drop spoonfuls of the strawberry sauce evenly on top.
-
Pour the remaining filling over, then add more strawberry sauce on top.
-
Using a skewer or butter knife, gently swirl the strawberry sauce into the filling to create that beautiful marbled effect.
🔥 Step 5: Bake and Cool
-
Place the springform pan in a water bath (wrap the outside with foil first to prevent leaks).
-
Bake at 160°C (320°F) for about 50–60 minutes or until the edges are set but the centre slightly jiggles.
-
Turn off the oven, crack the door, and let the cheesecake cool inside for 1 hour.
-
Remove from the oven and water bath, then chill in the fridge for at least 4 hours or overnight.
Your strawberry swirl cheesecake is now ready to slice, serve, and savour. It’s creamy, fruity, and guaranteed to wow any crowd!
-
-
Storage Instructions for Strawberry Swirl Cheesecake
After all that hard work, you want to keep your strawberry swirl cheesecake fresh and delicious for as long as possible. Here’s how to store it like a pro:
🧊 Refrigeration
Cheesecake should always be stored in the fridge to maintain its creamy texture and prevent spoilage. Wrap your cheesecake tightly with plastic wrap or place it in an airtight container to avoid it drying out or absorbing other fridge odours. Properly stored, it will stay fresh for up to 5 days.
❄️ Freezing
If you want to keep your cheesecake longer, freezing is your friend. Slice it into portions, then wrap each piece individually in plastic wrap and aluminium foil to protect against freezer burn. Store in an airtight container or heavy-duty freezer bag. Your cheesecake can last up to 2 months in the freezer.
When you’re ready to enjoy, thaw slices overnight in the fridge—slow and steady is key for maintaining that smooth, creamy texture.
-