
The Ultimate Guide to Strawberry Cheesecake
Strawberry cheesecake—just the thought of it makes your mouth water, right? This decadent dessert combines a buttery, crunchy crust, a lusciously creamy filling, and a vibrant strawberry topping that adds the perfect balance of sweetness and tartness. But did you know that cheesecake has an ancient history dating back to the Greeks? Or that mastering the right baking techniques can make the difference between a perfect cheesecake and one with cracks?
In this guide, we’ll cover everything: from its origins to the best ingredients, foolproof techniques, and variations you can try. Whether you’re a seasoned baker or a beginner, this article will help you create a cheesecake that’s as delicious as it is beautiful. Now, let’s get started!
The History of Cheesecake
Origins of Cheesecake
Cheesecake’s roots go way back—like, ancient Greece back. Historians believe the earliest form of cheesecake was served to Olympic athletes around 776 BC. It was a simple mix of cheese, honey, and wheat, baked to provide energy for competitors. Later, the Romans took this recipe, added eggs, and spread it across Europe. Fast-forward a few centuries, and we’ve got the creamy, rich version we adore today.
Evolution into Modern Desserts
During the 19th and 20th centuries, cheesecake evolved dramatically, especially with the invention of cream cheese in 1872. This game-changer gave cheesecake its signature smooth texture. Eventually, bakers began experimenting with flavors, and by the mid-20th century, strawberry cheesecake became a fan-favorite, thanks to its perfect harmony of creamy richness and fruity freshness. Today, this dessert comes in countless variations—from no-bake versions to swirled, layered, and even gluten-free options!
Ingredients and Their Roles
When it comes to making the perfect strawberry cheesecake, every ingredient plays a crucial role. It’s all about getting the right balance of textures and flavors. Let’s dive into the essential ingredients you’ll need to create this mouthwatering dessert.
Crust Components
The crust is the foundation of any cheesecake, and in strawberry cheesecake, it should be buttery, crisp, and just the right amount of sweet. The main players here are:
- Graham Cracker Crumbs: The star of the crust. Graham crackers bring that familiar, slightly sweet crunch that contrasts beautifully with the smooth filling.
- Butter: It’s all about the butter! This helps bind the crumbs together and adds richness to the crust.
- Sugar: Just a bit of sugar to enhance the sweetness and bring everything together.
All these come together to form a base that holds the cheesecake filling perfectly while adding a satisfying crunch.
Filling Ingredients
Now, onto the cheesecake filling. This is where the magic happens! The goal is a rich, creamy, and smooth filling that melts in your mouth. Here’s what you’ll need:
- Cream Cheese: The backbone of the cheesecake filling. It’s rich, creamy, and gives the cheesecake its signature smooth texture. Make sure it’s softened before you mix it!
- Sugar: Sweeten it up! The sugar balances out the tanginess of the cream cheese, creating that perfectly indulgent flavor.
- Sour Cream: Adds a slight tang to the filling, giving it depth and helping to prevent the cheesecake from being too sweet.
- Eggs: They provide structure and stability, giving the filling that creamy, yet firm consistency.
- Vanilla Extract: For a hint of sweetness and depth, vanilla is a must-have. It complements the other flavors beautifully without overpowering them.
All of these ingredients come together to form the perfect creamy filling that you’ll love spreading over the crust.
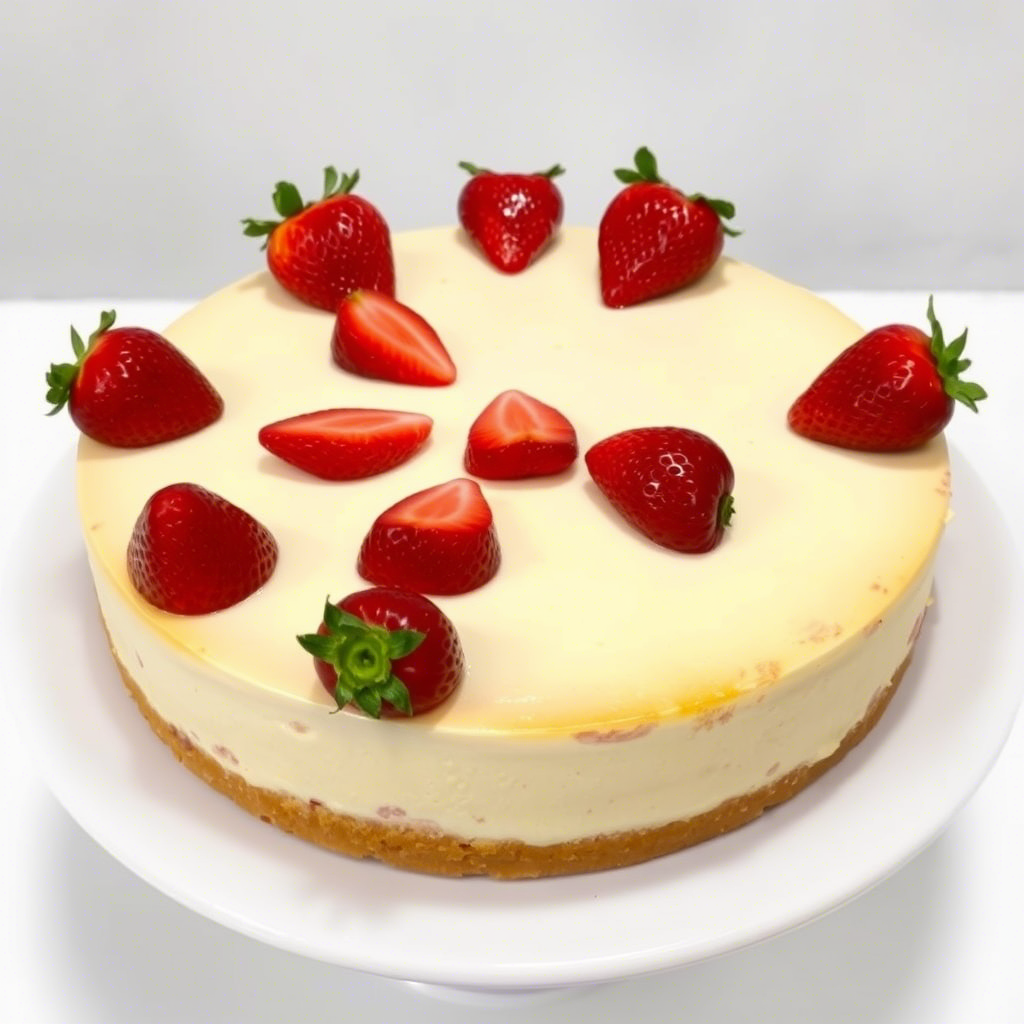
Strawberry Topping
What’s a strawberry cheesecake without the star of the show—strawberries? For the topping, you’ll need:
- Fresh Strawberries: They’re the heart and soul of the topping, bringing natural sweetness and a pop of color to the dessert.
- Sugar: This helps create a syrupy, sweet glaze that perfectly complements the richness of the cheesecake.
- Lemon Juice: Adds a little tang to balance the sweetness of the strawberries.
The topping is the cherry on top (literally!) and takes your cheesecake to the next level.
Essential Equipment for Making Strawberry Cheesecake
Now that we’ve got all the ingredients sorted, let’s talk about the equipment you’ll need to bring your strawberry cheesecake to life. Having the right tools will make the entire process smoother and ensure your cheesecake turns out perfect.
Baking Pan
A springform pan is your best friend when making cheesecake. Why? Because it allows you to easily remove the cheesecake without ruining its shape. The sides come off once the cheesecake is fully set, giving you a clean, beautiful presentation. A 9-inch pan is the most common size for standard recipes, but you can adjust based on the number of servings you want.
If you don’t have a springform pan, you can also use a regular round cake pan, but you may need to line it with parchment paper to help release the cheesecake once it’s done.
Mixer
A stand mixer or handheld mixer is ideal for making the cheesecake filling. You’ll need to mix the cream cheese and sugar until smooth and creamy, and a mixer ensures that you won’t overwork the batter. If you’re going by hand, it will take a lot more effort and time to get the right consistency. So, if you want a creamy, lump-free filling, a mixer is a must!
Spatula & Whisk
A rubber spatula helps you scrape down the sides of your mixing bowl to make sure everything is incorporated, while a whisk is essential for mixing the strawberry topping (or if you prefer to make a strawberry syrup). They’re small tools, but they play big roles in the process!
Step-by-Step Guide to Making Strawberry Cheesecake
It’s time to roll up your sleeves and dive into the strawberry cheesecake making process! Don’t worry, it’s easier than it sounds, and with the right steps, you’ll have a decadent dessert in no time. Here’s how to make the perfect cheesecake—smooth, creamy, and topped with fresh strawberries.
Step 1: Prepare the Crust
Start by preheating your oven to 325°F (163°C). Grab your springform pan and get the crust ready:
- Crush the Graham Crackers: Place graham crackers in a food processor or a ziplock bag, and crush them until they’re fine crumbs. You’ll need about 1 ½ cups.
- Mix the Ingredients: In a bowl, combine the graham cracker crumbs, sugar, and melted butter. Stir until everything is well-coated and holds together when pressed.
- Press the Crust: Press the mixture evenly into the bottom of the springform pan, packing it down firmly. Use a spoon or the bottom of a glass to smooth it out.
- Bake: Bake the crust for about 10 minutes to set it, then remove it from the oven and let it cool while you prepare the filling.
Step 2: Make the Cheesecake Filling
- Blend the Cream Cheese: In a large bowl, beat the softened cream cheese until smooth using a stand mixer or hand mixer.
- Add the Sugar: Add sugar and continue mixing until it’s fully incorporated and smooth. Scrape down the sides as needed.
- Mix in the Sour Cream: Add sour cream and vanilla extract. Beat until the mixture is light and fluffy.
- Add Eggs: Add eggs one at a time, mixing on low speed just until combined. Be careful not to overmix! Overmixing can cause cracks during baking.
- Pour the Filling: Pour the cheesecake filling over the cooled graham cracker crust. Smooth the top with a spatula to make it even.
Step 3: Bake the Cheesecake
- Bake in a Water Bath: This is an optional step, but baking the cheesecake in a water bath helps to prevent cracking. To do this, wrap the bottom of your springform pan with aluminum foil and place it in a larger pan filled with hot water.
- Bake: Bake the cheesecake for 50-60 minutes, or until the edges are set and the center is still slightly jiggly.
- Cool Slowly: After baking, turn off the oven and leave the cheesecake inside for 1 hour. This gradual cooling helps prevent cracks. Once an hour passes, remove the cheesecake and let it cool completely on a wire rack.
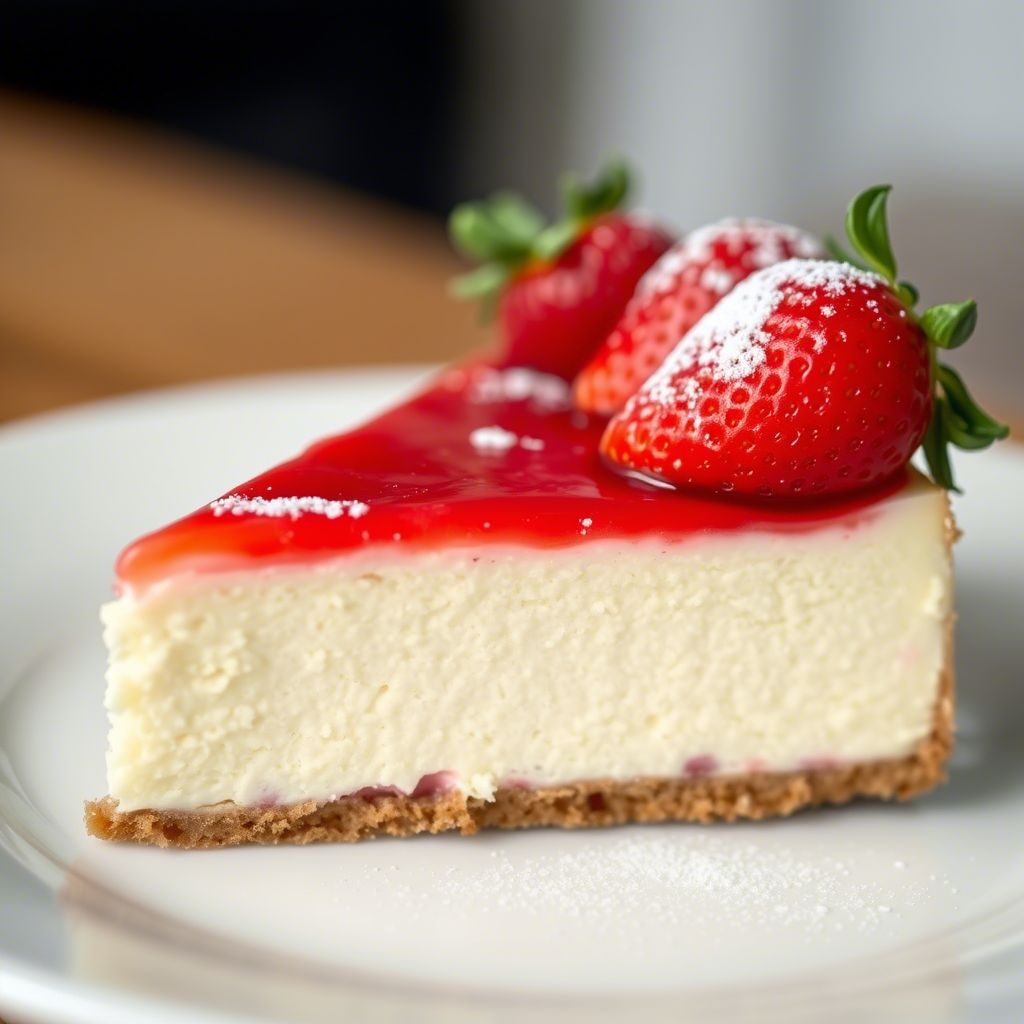
Step 4: Add the Strawberry Topping
- Prepare the Strawberries: While the cheesecake is cooling, prepare the strawberry topping. Slice fresh strawberries and mix them with a little sugar and lemon juice to create a syrup.
- Top the Cheesecake: Once the cheesecake has cooled completely, spoon the strawberry mixture over the top and refrigerate for at least 4 hours, or overnight.
Pro Tips for Storing and Serving Strawberry Cheesecake
Congratulations, you’ve made a beautiful strawberry cheesecake! But the journey isn’t over yet—now it’s time to make sure it stays fresh and looks fabulous when you serve it. Here are some essential tips on storing and serving your cheesecake, so it stays perfect for your guests or family.
Storing Your Strawberry Cheesecake
Once your cheesecake is ready and topped with those gorgeous strawberries, proper storage is key to keeping it fresh and delicious. Here’s how you can store your cheesecake without sacrificing flavor or texture:
- Refrigerate: After adding the strawberry topping, cover the cheesecake with plastic wrap or foil and store it in the refrigerator. It should stay fresh for up to 5 days. If you’re not serving it right away, make sure the topping is chilled, and avoid keeping the cheesecake out at room temperature for more than 2 hours.
- Freezing: If you want to make the cheesecake in advance, freezing is a great option! To freeze, wrap the cheesecake tightly in plastic wrap and aluminum foil. When ready to serve, let it thaw in the fridge overnight. For best results, don’t freeze the strawberry topping, as it may release moisture when thawed.
Serving Your Strawberry Cheesecake
When it’s time to serve, you want your strawberry cheesecake to look as good as it tastes. Here’s how to make it look like a pro’s creation:
- Slice Cleanly: Use a sharp knife and dip it in warm water before slicing. This ensures clean cuts and prevents the cheesecake from sticking to the knife. Wipe the knife clean between slices to keep the edges smooth.
- Garnish: You can get creative with your presentation! Add extra strawberries around the edges, drizzle a bit of strawberry syrup, or top with a dollop of whipped cream.
- Serve Chilled: For the best flavor and texture, serve your cheesecake chilled. Don’t let it sit out for too long before serving, as the cheesecake will soften and lose its perfect consistency.