
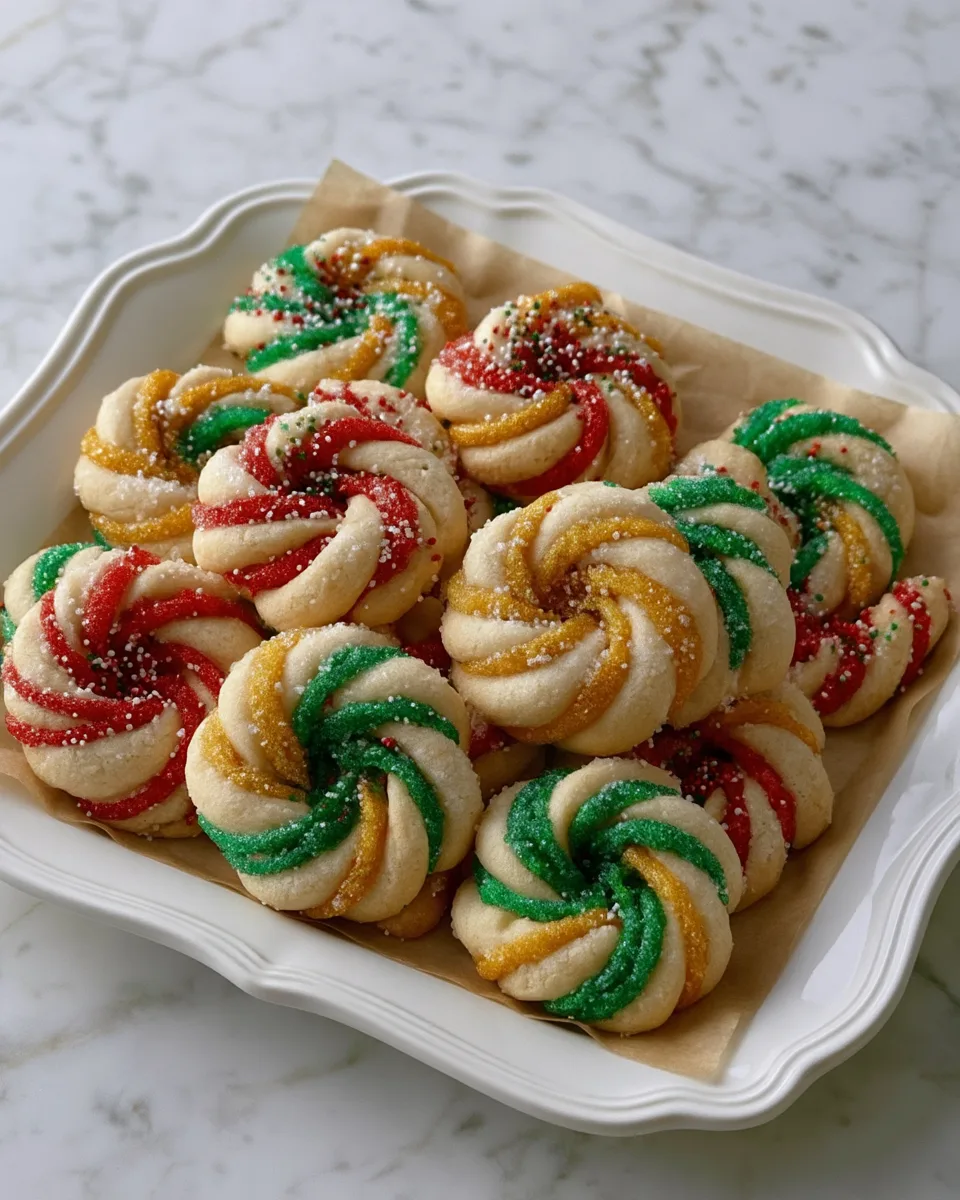
Bring a little extra magic to your holiday baking with these beautiful Twisted Christmas Cookies! With their festive colors, delicate twisted shape, and delicious buttery flavor, these cookies are a fun and delicious addition to any Christmas celebration.
PrintTwisted Christmas Cookies – Easy, Buttery & Festive

Make these easy Twisted Christmas Cookies with buttery vanilla dough and festive red and green colors. Perfect for holiday parties and gifting!
Ingredients
For the Cookie Dough
- 1 cup(2sticks) unsalted butter, softened
- ¾ cupgranulated sugar
- 1large egg
- 2 teaspoonsvanilla extract
- 2½ cupsall-purpose flour
- ½ teaspoonbaking powder
- ¼ teaspoonsalt
- 2 tablespoonsmilk
For the Colored Dough
- Red gel food coloring
- Green gel food coloring
For Decoration
- ¼ cupgranulated sugar
- 2 tablespoonsholiday sprinkles
- ½ cupwhite chocolate chips, melted (optional)
Instructions
Prepare the Cookie Dough
- In a large bowl, beat the softened butter and granulated sugar until light and fluffy.
- Add the egg and vanilla extract, mixing until smooth.
- In a separate bowl, whisk together the flour, baking powder, and salt.
- Gradually add the dry ingredients to the butter mixture.
- Mix in the milk until a soft, manageable dough forms.
Divide and Color the Dough
- Divide the dough into three equal portions.
- Leave one portion plain, color the second portion red, and color the third portion green using gel food coloring.
- Knead each portion gently until the colors are evenly distributed.
- Wrap the dough portions separately and refrigerate for 30–45 minutes.
Shape the Twisted Cookies
- Preheat the oven to 350°F (175°C). Line baking sheets with parchment paper.
- Take a small piece of red dough and an equal-sized piece of plain or green dough.
- Roll each piece into a rope about 5 inches long.
- Place the ropes side by side and gently twist them together.
- Curve the twisted dough into a spiral, candy-cane shape, or loose Christmas wreath.
- Repeat with the remaining dough, leaving about 2 inches between cookies on the baking sheets.
Add the Decoration
- Lightly roll the shaped cookies in granulated sugar if desired.
- Sprinkle with holiday sprinkles, gently pressing them into the dough so they stay in place.
Bake the Cookies
- Bake for 10–12 minutes, or until the edges are just set and the bottoms are lightly golden.
- Avoid overbaking to keep the cookies tender and preserve their festive colors.
- Let the cookies cool on the baking sheets for 5 minutes before transferring them to a wire rack.
Finish and Serve
- Once completely cooled, drizzle with melted white chocolate if desired.
- Allow the chocolate to set before serving.
- Arrange the twisted Christmas cookies on a festive platter or package them in holiday cookie boxes.
Made with a soft, tender cookie dough and shaped into pretty twists, these homemade Christmas cookies look just as wonderful as they taste. Their lightly crisp edges and soft centers make every bite irresistible, while the festive appearance makes them perfect for holiday dessert trays, cookie exchanges, and Christmas gatherings.
The best part? You don’t need complicated ingredients or special baking skills to make them. The dough is easy to prepare, simple to shape, and fun to work with, making this recipe a lovely activity to enjoy with family during the holiday season.
Whether you’re preparing homemade treats for guests, filling Christmas gift boxes, or creating a festive dessert table, these Twisted Christmas Cookies will bring color, sweetness, and holiday cheer to every occasion.
Why You’ll Love These Twisted Christmas Cookies
- Beautiful festive appearance:Their twisted shape and Christmas-inspired colors make them stand out on any holiday dessert table.
- Soft and buttery texture:Each cookie has a tender center with lightly crisp edges.
- Simple ingredients:Made with everyday baking staples that are easy to find.
- Fun to make:Twisting and shaping the dough is an enjoyable activity for both adults and children.
- Perfect for gifting:Package them in decorative holiday boxes or bags for thoughtful homemade Christmas gifts.
- Great for holiday gatherings:These cookies are ideal for Christmas parties, cookie exchanges, and family celebrations.
- Easy to customize:You can experiment with different colors, sprinkles, and extracts to create your own festive version.
What Makes This Recipe Special?
What makes Twisted Christmas Cookies special is their combination of simple homemade flavor and eye-catching presentation.
The buttery cookie dough creates a soft, delicate texture with a delicious vanilla aroma. The dough is divided into portions, colored with festive shades, and twisted together to create a beautiful pattern that makes every cookie look unique.
Unlike ordinary round Christmas cookies, these twisted treats have a playful homemade appearance that adds something special to your holiday baking. Their festive colors make them especially attractive on Christmas dessert platters, while their buttery sweetness makes them enjoyable for everyone.
You can also decorate them with a light dusting of powdered sugar or festive sprinkles to give them an extra holiday touch.
Helpful Tips for the Best Results
- Use softened butter:Allow the butter to reach room temperature so it combines easily with the sugar and creates a smooth dough.
- Measure the flour correctly:Too much flour can make the cookies dry and difficult to twist.
- Avoid overmixing:Mix the dough just until the ingredients come together to keep the cookies tender.
- Use gel food coloring:Gel coloring provides vibrant Christmas colors without adding too much liquid to the dough.
- Chill the dough if necessary:If the dough becomes too soft or sticky, refrigerate it for about 20–30 minutes before shaping.
- Keep the twists even:Try to make the dough ropes similar in thickness so the cookies bake evenly.
- Don’t overbake:Remove the cookies when the edges are just lightly set. They will continue to firm up as they cool.
- Let them cool completely:Allow the cookies to cool on the baking sheet for a few minutes before transferring them to a wire rack.
When to Serve Twisted Christmas Cookies
These festive cookies are perfect for almost every holiday occasion.
- Christmas cookie exchanges:Their colorful twisted design makes them a beautiful addition to cookie swaps.
- Holiday dessert tables:Arrange them alongside gingerbread cookies, sugar cookies, and chocolate treats.
- Christmas gifts:Place them in decorative tins or transparent gift bags tied with festive ribbons.
- Family baking days:Make them with children and let everyone help twist and shape the dough.
- Christmas parties:Serve them with hot chocolate, coffee, or tea for a cozy holiday treat.
- Holiday movie nights:Enjoy a plate of these buttery cookies while watching your favorite Christmas movies.
These Twisted Christmas Cookies are more than just a sweet holiday treat. They’re a fun baking project, a beautiful homemade gift, and a delicious way to make your Christmas celebrations even more special.
Ingredients
These Twisted Christmas Cookies are made with a simple buttery sugar cookie dough that is easy to mix, color, and shape. A touch of vanilla gives them a delicious homemade flavor, while festive food coloring creates their beautiful holiday appearance.
Ingredients You’ll Need
- 2 ½ cups (315 g) all-purpose flour
- 1 teaspoon baking powder
- ¼ teaspoon salt
- ¾ cup (170 g) unsalted butter, softened
- ¾ cup (150 g) granulated sugar
- 1 large egg
- 2 teaspoons vanilla extract
- 1 tablespoon milk, if needed
- Red gel food coloring
- Green gel food coloring
Optional Decoration:
- 2 tablespoons Christmas sprinkles
- 2 tablespoons powdered sugar for dusting
- A little egg white or milk for attaching sprinkles
Ingredient Notes and Substitutions
All-purpose flour:Provides structure and helps the cookies hold their twisted shape. Measure carefully to avoid adding too much flour.
Unsalted butter:Gives the cookies their rich, buttery flavor and tender texture. Make sure it is softened but not melted.
Granulated sugar:Adds sweetness and helps create lightly crisp edges while keeping the centers tender.
Egg:Helps bind the ingredients together and gives the dough a smooth, workable consistency.
Vanilla extract:Adds a warm, sweet aroma that complements the buttery cookie dough. You can also use almond extract for a slightly different flavor.
Baking powder:Helps the cookies rise slightly without losing their shape.
Gel food coloring:Red and green gel colors create vibrant Christmas shades without making the dough too wet. Add a little at a time until you reach your preferred colors.
Milk:A small amount can help bring the dough together if it feels too dry. Add it gradually rather than all at once.
Equipment You’ll Need
- Large mixing bowl
- Medium mixing bowl
- Electric hand mixer or stand mixer
- Whisk
- Rubber spatula
- Measuring cups and spoons
- Baking sheets
- Parchment paper
- Plastic wrap
- Sharp knife or dough scraper
- Wire cooling rack
Before You Begin
- Remove the butter and egg from the refrigerator so they can reach room temperature.
- Preheat your oven to350°F (175°C).
- Line baking sheets with parchment paper.
- Measure all the ingredients before starting.
- Prepare the red and green gel food coloring.
- Make sure your work surface is clean and lightly floured for shaping the twisted cookies.
- If your kitchen is warm or the dough becomes sticky, prepare some space in the refrigerator to chill it before shaping.
Preparation Time
- Prep Time:25 minutes
- Chilling Time:30 minutes
- Cook Time:10–12 minutes
- Total Time:Approximately 1 hour 10 minutes
- Servings:24 cookies

Step-by-Step Instructions
Prepare the Dry Ingredients
In a medium mixing bowl, whisk together the all-purpose flour, baking powder, and salt. Set aside while you prepare the butter mixture.
Cream the Butter and Sugar
In a large mixing bowl, beat the softened butter and granulated sugar with an electric mixer for about 2–3 minutes until light, fluffy, and creamy.
Add the Egg and Vanilla
Add the egg and vanilla extract to the butter mixture. Beat again until everything is fully combined and smooth. Scrape down the sides of the bowl with a rubber spatula if needed.
Make the Cookie Dough
Gradually add the dry ingredients to the wet mixture, mixing on low speed until a soft dough forms. If the dough feels too dry or crumbly, add milk one teaspoon at a time until it comes together.
Avoid overmixing to keep the cookies tender.
Divide and Color the Dough
Divide the dough into three equal portions. Leave one portion plain, add red gel food coloring to the second portion, and green gel food coloring to the third.
Knead each colored portion gently until the color is evenly distributed. Add more coloring gradually if you want brighter shades.
Chill the Dough
Wrap each portion separately in plastic wrap and refrigerate for about 30 minutes. Chilling makes the dough easier to handle and helps the cookies maintain their twisted shape during baking.
Shape the Twisted Cookies
Take small portions of the plain, red, and green dough. Roll each color into thin ropes of approximately equal length and thickness.
Place the three ropes side by side, gently press one end together, and twist them around each other to create a festive striped pattern. Curve the twisted dough into a candy-cane shape or leave it as a simple twist.
Transfer each shaped cookie to the prepared baking sheet, leaving about 2 inches of space between them.
Bake Until Lightly Golden
Bake in the preheated oven at350°F (175°C)for approximately 10–12 minutes, or until the edges are just set.
The cookies should remain relatively pale, as you don’t want the festive colors to become too brown.
Cool and Decorate
Remove the baking sheets from the oven and let the cookies cool for about 5 minutes before transferring them to a wire rack.
Once completely cooled, dust lightly with powdered sugar or add Christmas sprinkles if desired.
Helpful Tips for Perfect Results
- Use gel food coloring:It creates vibrant colors without changing the dough consistency.
- Keep the dough cool:If it becomes sticky while shaping, return it to the refrigerator for a few minutes.
- Make equal dough ropes:Similar thickness helps the cookies bake evenly.
- Don’t twist too tightly:Gentle twisting creates a beautiful pattern without stretching or breaking the dough.
- Avoid adding too much flour:Excess flour can make the cookies dry and difficult to shape.
- Watch the baking time:Remove the cookies when the edges are just set to maintain their soft, buttery texture.
- Cool before decorating:Allow the cookies to cool completely before adding powdered sugar or sprinkles.
- Bake similar-sized cookies together:This helps ensure they finish baking at the same time.
Serving Suggestions
These Twisted Christmas Cookies are beautiful on their own, but you can make your holiday presentation even more special with a few simple serving ideas.
- With hot chocolate:Serve them with a warm cup of hot chocolate for a cozy Christmas treat.
- With coffee or tea:Their buttery vanilla flavor pairs perfectly with your favorite warm drink.
- On a Christmas dessert platter:Arrange them alongside gingerbread cookies, sugar cookies, and chocolate truffles.
- As homemade gifts:Place the cookies in decorative Christmas tins or clear gift bags tied with festive ribbons.
- With a sweet dipping sauce:Serve them with melted white chocolate or a simple vanilla glaze for extra sweetness.
Storage Instructions
At Room Temperature:Allow the cookies to cool completely before placing them in an airtight container. Store at room temperature for up to 5–7 days.
In the Refrigerator:Refrigeration is generally unnecessary for these cookies. However, if your kitchen is particularly warm, you can store them in an airtight container in the refrigerator for up to 10 days.
In the Freezer:Place completely cooled cookies in a freezer-safe container, separating layers with parchment paper. Freeze for up to 2 months. Thaw at room temperature before serving.
Freezing the Dough:You can also prepare the colored dough ahead of time. Wrap each portion tightly in plastic wrap and freeze for up to 2 months. Thaw overnight in the refrigerator before shaping.
Variations to Try
Red and White Christmas Twists:Use only red and plain cookie dough to create a classic candy-cane-inspired appearance.
Green and White Christmas Cookies:Combine green and plain dough for a simple festive design that looks beautiful on holiday dessert platters.
Chocolate Christmas Twists:Replace ¼ cup of the flour with unsweetened cocoa powder in one portion of the dough for a delicious chocolate-colored twist.
Peppermint Christmas Cookies:Add ¼ teaspoon peppermint extract to the dough for a refreshing holiday flavor.
Almond Vanilla Twists:Replace half the vanilla extract with almond extract for a delicate nutty aroma.
White Chocolate Christmas Twists:Dip one end of each cooled cookie into melted white chocolate and decorate with red and green sprinkles.
Festive Sprinkle Cookies:Gently press Christmas sprinkles onto the shaped dough before baking for extra color and texture.
Frequently Asked Questions
Why is my cookie dough too sticky to twist?
The dough may be too warm or soft. Refrigerate it for 20–30 minutes before shaping. You can also lightly flour your hands and work surface, but avoid adding too much extra flour.
Can I make the dough ahead of time?
Absolutely! Prepare the dough, divide and color it, then wrap each portion separately and refrigerate for up to 2 days. Let it soften slightly if it becomes too firm before shaping.
Can I use liquid food coloring instead of gel?
Yes, but gel food coloring is recommended because it provides stronger colors without adding much moisture. If using liquid coloring, add it gradually and avoid adding too much.
Why did my Christmas cookies lose their shape?
This can happen when the dough is too warm or the cookies are placed in an oven that hasn’t reached the correct temperature. Chill the shaped cookies for 10–15 minutes before baking if your kitchen is warm.
How do I keep the red and green colors bright?
Use gel food coloring and avoid overbaking. Remove the cookies as soon as the edges are set, while the centers and colored dough remain relatively pale.
Can I make these cookies without an electric mixer?
Yes! You can use a sturdy whisk and a rubber spatula. Make sure the butter is properly softened so it combines easily with the sugar.
Can children help make these cookies?
Definitely! Children can help divide the dough, choose the colors, roll the dough ropes, and create the twists. Adult supervision is recommended when handling baking trays and hot ovens.
Can I decorate the cookies before baking?
Yes. You can add small Christmas sprinkles before baking. However, powdered sugar and melted chocolate decorations are best added after the cookies have cooled.
Final Thoughts
Twisted Christmas Cookies are a beautiful and delicious way to bring festive cheer to your holiday baking. Their buttery vanilla flavor, soft texture, and colorful twisted design make them a wonderful addition to Christmas celebrations.
Whether you’re preparing them for a family gathering, filling holiday gift boxes, or enjoying a cozy afternoon of Christmas baking, these homemade cookies are sure to make the season sweeter. Make a batch, share them with loved ones, and enjoy a little extra holiday magic in every bite!